How to Set Up sGTM for Shopify in Under 30 Minutes (No GCP Account Needed)
Skip Google Cloud entirely. This step-by-step guide gets your Shopify store sending Meta CAPI purchase events through a server-side GTM container — in under 30 minutes, no developer needed.
How to Set Up sGTM for Shopify in Under 30 Minutes (No GCP Account Needed)
Most sGTM setup guides start with "first, create a Google Cloud Platform account." Then they walk you through billing setup, Cloud Run services, Docker containers, and SSL certificate management - before you've tracked a single event.
That's the hard way. It's also the way most Shopify merchants give up halfway through and go back to a broken Pixel.
This guide is the other way. We're going to skip GCP entirely, use managed sGTM hosting, and get your Shopify store sending purchase events to Meta CAPI and GA4 through a server-side container - in under 30 minutes.
Here's exactly what you'll have at the end:
✅ A live sGTM server container running on your own subdomain
✅ Your Shopify events are routing through the server container
✅ Meta CAPI connected and sending purchase events with deduplication
✅ GA4 receiving server-side events
✅ Everything verified and confirmed working
Let's go.
What You Need Before You Start
Make sure you have access to these four things before opening any tabs:
1. Google Tag Manager with a web container already installed on your Shopify store. If you don't have GTM on Shopify yet, install it first - there are several free apps in the Shopify App Store that add the GTM snippet correctly.
2. A GA4 property connected to your store. You need your GA4 Measurement ID - it looks like G-XXXXXXXXXX.
3. Meta Events Manager access — specifically your Pixel ID and the ability to generate a CAPI Access Token. Both are under your Pixel settings.
4. Access to your domain's DNS settings — wherever you manage your domain (GoDaddy, Namecheap, Cloudflare, or Shopify Domains). You'll add one DNS record. Takes under 5 minutes.
Got all four? Good. Start a timer.
Step 1: Create Your Server Container in GTM (3 minutes)
Start here — in GTM, not in Servero. This is the step most guides get wrong.
Open Google Tag Manager and go to your Web container. In the top-left, click Admin, then click the (+) icon
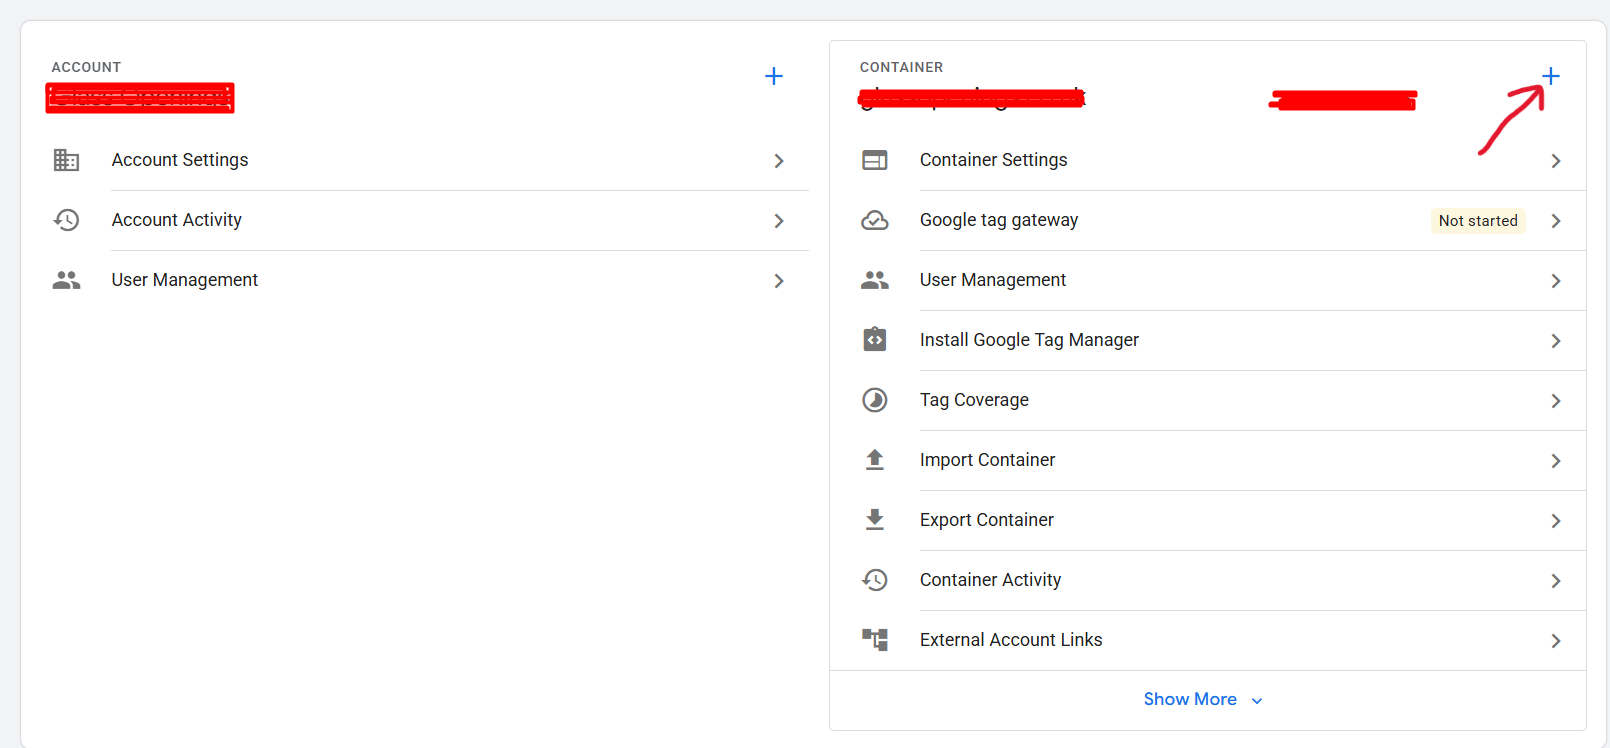
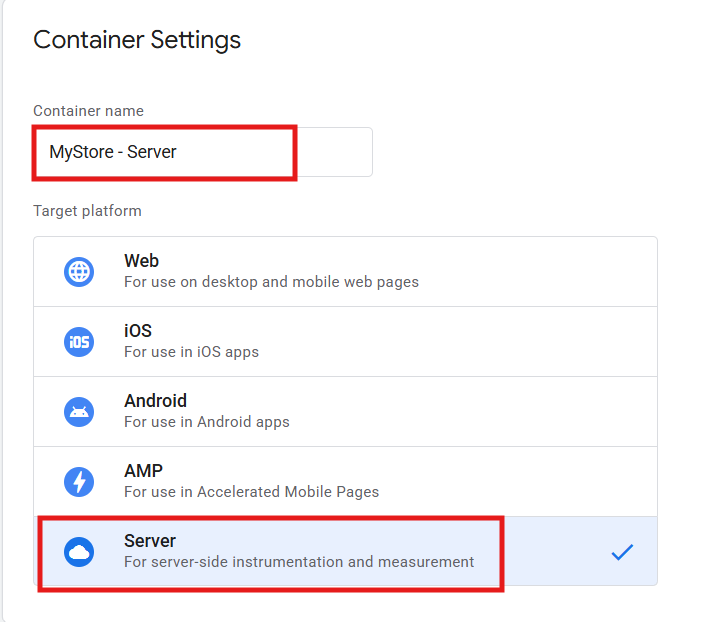
Give it a name — something like "MyStore - Server" to keep it separate from your web container. Under Target Platform, select Server.
GTM will ask how you want to provision the tagging server. Select "Manually provision tagging server." Do not select the automatic option — that tries to connect to Google Cloud directly.
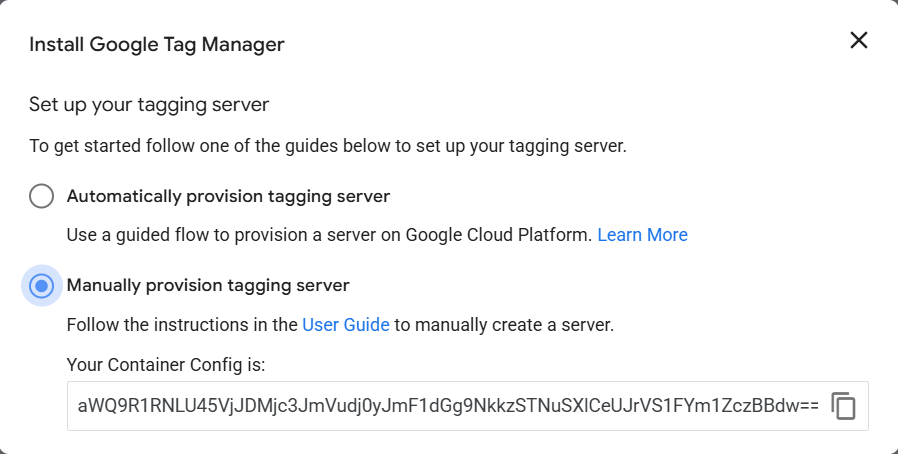
GTM will now show you a Container Config string - a long block of characters. Copy this string and save it somewhere — a notes app, a text file, anywhere. You'll need it in the next step.
Leave this tab open.
Step 2: Create Your Container on Servero (3 minutes)
Now open Servero.io in a new tab and create a free account. No credit card required.
Once you're in the dashboard, click Create Container. You'll be asked for three things:
Container name — anything works. "MyStore sGTM" is fine
Container Config — paste the string you copied from GTM in Step 1
Server location — choose the region closest to where most of your customers are (US, EU, or Asia)
Click Create Container.
Servero provisions your server infrastructure automatically - this takes about 5 minutes. You'll see the status update to "Running" when it's ready.
No Google Cloud configuration. No billing account. No Docker. The platform handles everything. You're done with the infrastructure.
Step 3: Connect Your Custom Domain (5 minutes)
Your sGTM container needs to run on a subdomain of your own store — something like data.yourstore.com or metrics.yourstore.com. This makes it first-party: browsers see the tracking as coming from you, not a third party.
In your Servero dashboard, open your container and go to Domains → Add Custom Domain.
Enter the subdomain you want to use. Servero will show you a CNAME record to add — it looks like this:
Type:   CNAME
Host:   data
Value:  containers.servero.io
TTL:    Auto
Open your DNS settings in a new tab and add this record:
GoDaddy: My Products → DNS → Add Record
Namecheap: Domain List → Manage → Advanced DNS → Add New Record
Cloudflare: Select domain → DNS → Add Record (turn proxy OFF — grey cloud, not orange)
Shopify Domains: Online Store → Domains → DNS Settings → Add Record
Save the record. DNS propagation takes 10 minutes to a few hours. Servero will email you when verified. Continue with the next steps while you wait.
Step 4: Connect the Domain Back to GTM (2 minutes)
This is the step most guides leave out — and it's what completes the link.
Go back to your GTM server container → Admin → Container Settings.
In the Tagging Server URL field, enter your full custom domain:
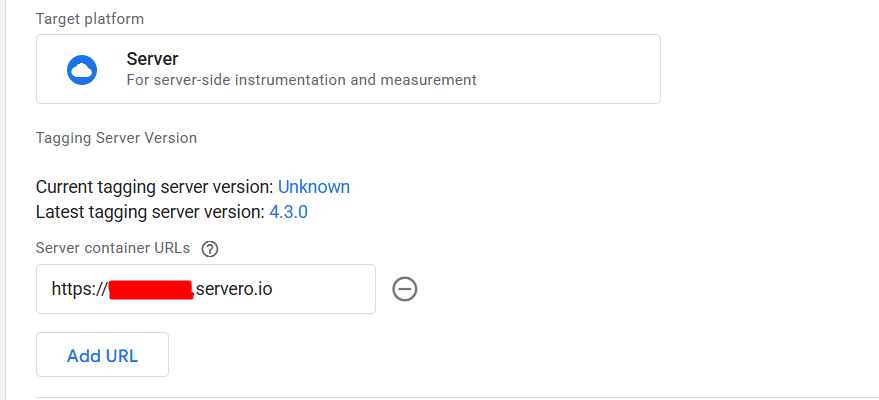
Format exactly like this:
✅
https://data.yourstore.com❌
https://data.yourstore.com/— no trailing slash❌
data.yourstore.com— must include https://
Save. This tells GTM where its server is actually running.
Step 5: Update Your GA4 Configuration Tag in the Web Container (3 minutes)
This is the step that turns on server-side routing. Right now your Shopify events go directly from the browser to Google's servers. After this step, they go to your server first.
Open your web GTM container — the one already installed on Shopify.
Find your Google Analytics 4 Configuration tag (the one with your G-XXXXXXXXXX Measurement ID). Open it.
Look for the field called Server Container URL. Enter your subdomain:
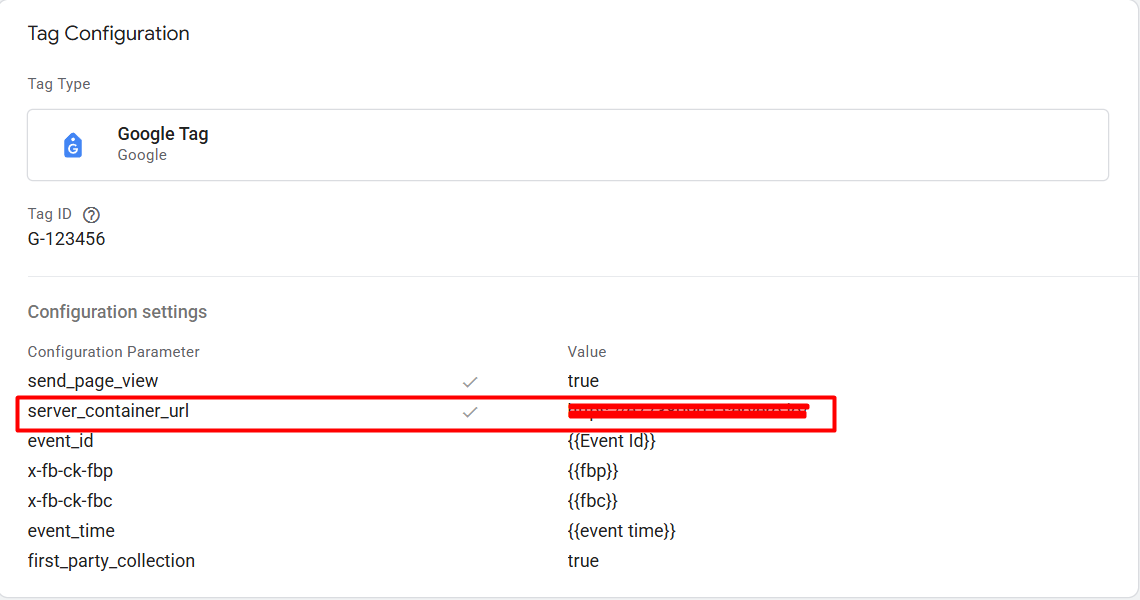
Save the tag. Do not publish yet — you'll publish both containers together at the end.
This single change is what makes everything flow through your server. Your GA4 tag now sends all event data — every parameter, every user property, everything — to your server container first. The server then decides where to forward it.
Step 6: Add event_id to Your Web Container Tags (4 minutes)
Before setting up the server-side CAPI tag, you need to wire up deduplication in the web container. This is where the event_id lives — not in the server container.
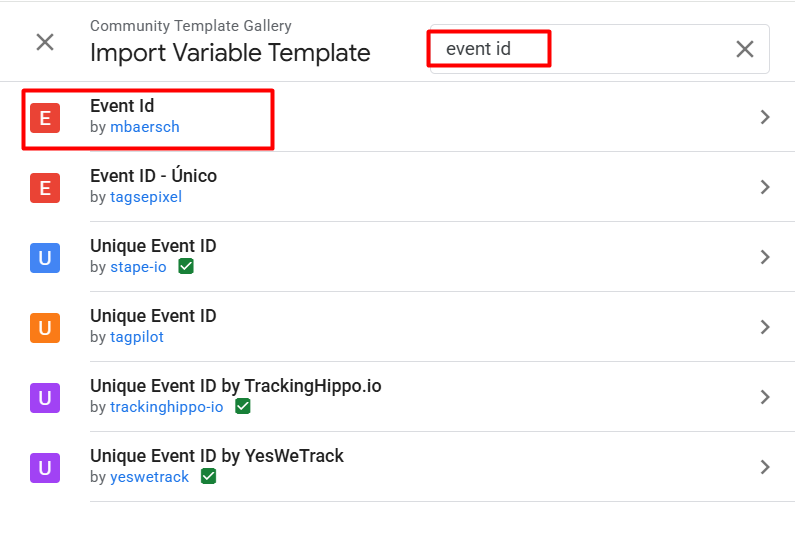
Get the Event ID variable:
In your web GTM container, go to Variables → scroll to the bottom → click "Discover more variable types in the Community Template Gallery."
Search for Event ID. Add the template to your workspace. This creates a ready-made variable that generates a unique, consistent ID per event — no custom JavaScript needed.
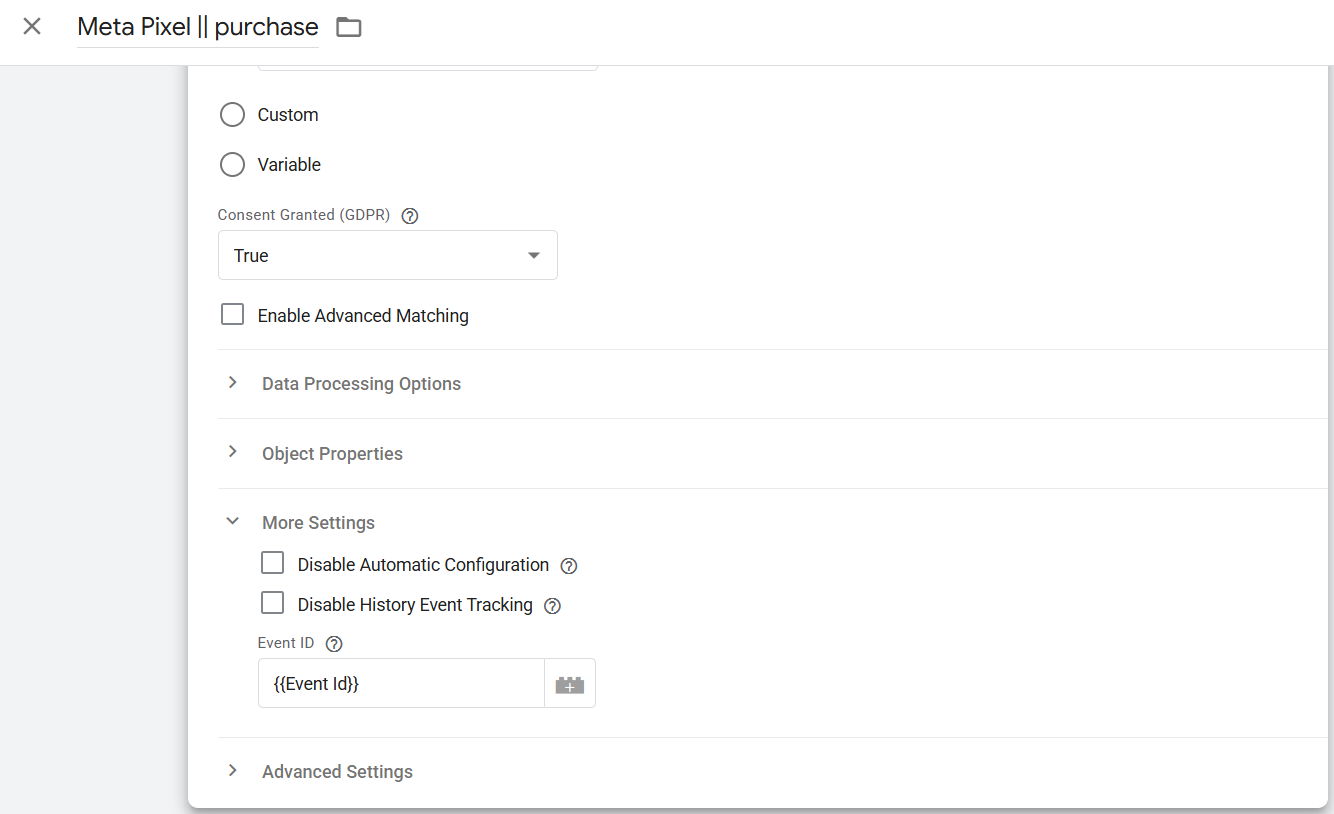
Add event_id to your Meta Pixel purchase tag:
Open your Meta Pixel tag for purchase events in the web container. In the event parameters section, add:
Add event_id to your GA4 purchase event tag:
Open your GA4 purchase event tag in the web container. In the event parameters section, add the same:
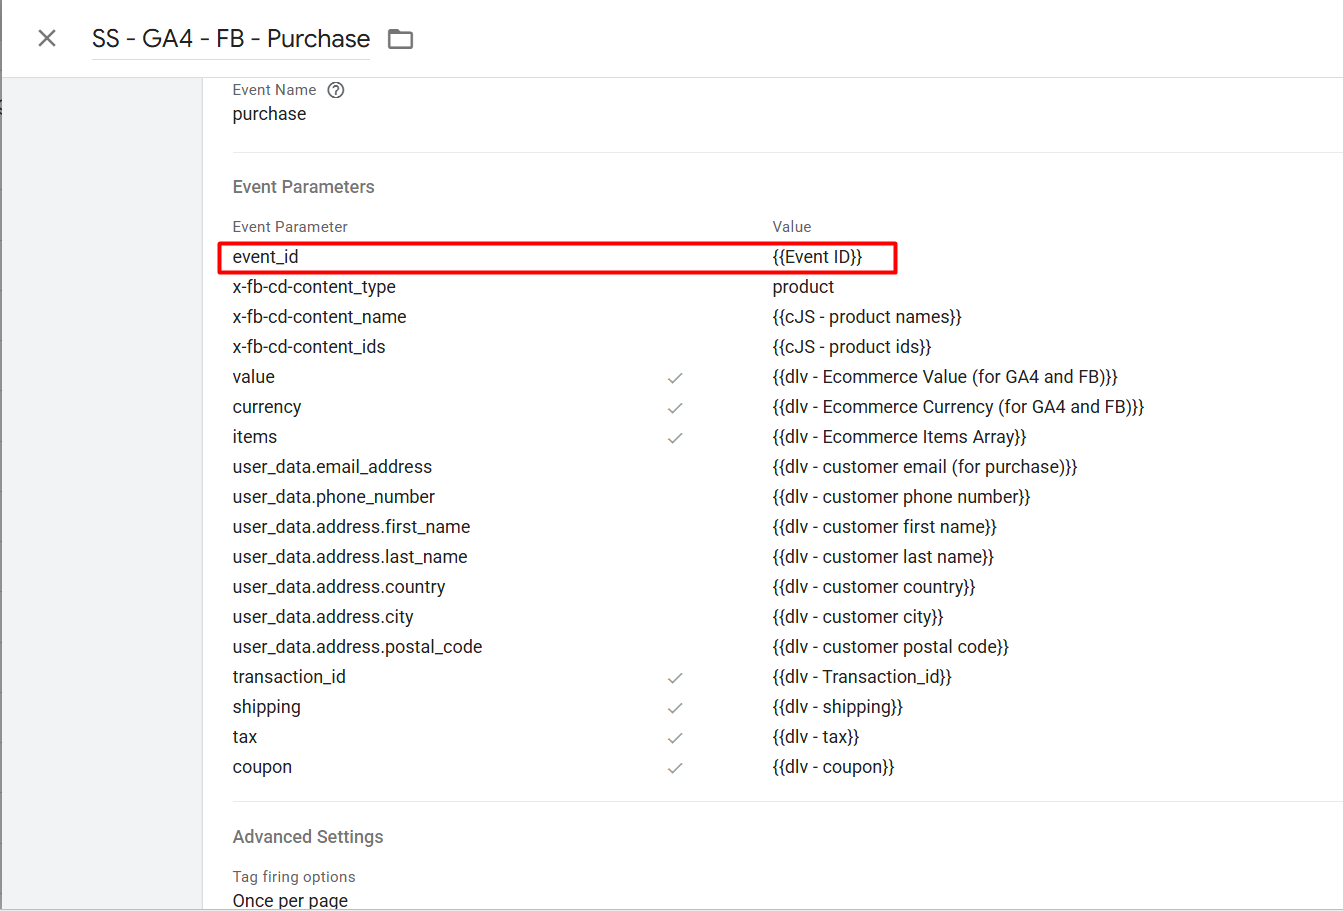
This is what carries event_id to your server container. The GA4 tag forwards all its parameters — including event_id — to the server automatically. The server container receives it without any additional setup.
Save both tags.
Step 7: Set Up the Meta CAPI Tag in the Server Container (5 minutes)
Now switch to your GTM server container.
Click New Tag. Search for Conversions API Tag in the template gallery and add it to your workspace first if you haven't already. Then select it as your tag type.
Fill in the credentials:
Pixel ID: Your Meta Pixel ID — found in Meta Events Manager → your Pixel → Settings
API Access Token: Generate this in Meta Events Manager → your Pixel → Settings → Conversions API → Generate Access Token
This Tag will automatically "Inherit from client."
This is the key. The CAPI tag automatically reads all the event data that arrived from your GA4 web tag - event name, parameters, customer data, event_id - everything. No manual parameter mapping required. The tag handles it all.
The event_id You added to the GA4 tag in Step 6, which arrives here automatically and gets forwarded to Meta, enabling deduplication without any additional configuration in the server container.
Create the trigger:
Create a trigger that fires when the Event Name equals purchase. This tells the CAPI tag to fire specifically on purchase events arriving from your web container.
Save the tag.
Step 8: Publish Both Containers (2 minutes)
Both containers need to be published separately. People forget this - it's the most common reason a setup that works in preview doesn't work in production.
Publish the server container first: In your GTM server container workspace → click Submit → add a version name → click Publish.
Then publish the web container: Switch to your web container workspace → click Submit → add a version name → click Publish.
Server container first - so it's ready to receive traffic by the time the web container starts routing to it.
Step 9: Verify Everything Is Working (5 minutes)
Don't skip verification. A setup that looks complete but has one broken link silently loses data.
Check 1 — GTM Server Container Preview:
In your GTM server container, click Preview. Open your Shopify store in a new tab and complete a test purchase (use a discount code or Shopify's test payment gateway).
In the server preview, you should see:
✅ A request arriving at the server container
✅ The Facebook CAPI tag is firing on that request
✅
event_idpresent in the event data
If no request arrives → the Server Container URL in your GA4 Config tag is wrong, or DNS hasn't propagated yet. Wait 15 minutes and try again.
Check 2 — Meta Events Manager Test Events:
Go to Meta Events Manager → your Pixel → Test Events.
Enter your store URL, start the test, and complete a purchase. You should see:
✅ Purchase event received
✅ Source: Server
✅ Parameters: value, currency, content_ids present
✅ User data fields present (shown as hashed)
Check 3 — Event Match Quality:
In Events Manager, click your Purchase event and look at the Event Match Quality score. A fresh setup starts at 5–7 and improves as real customer data accumulates over the next few days.
If it's below 5 immediately, check that customer data (email, phone) is being pushed to your Shopify data layer at the checkout stage and making it into the GA4 event parameters.
Check 4 — Deduplication:
In Events Manager, after a few real purchases, confirm you see both Browser and Server events for Purchase, but the total conversion count isn't doubled. If conversions look inflated, the event_id values aren't matching. Revisit Step 6 and confirm the Event ID variable is added to both the Pixel tag and the GA4 event tag.
Common Issues and Quick Fixes
No events are arriving in the server container preview → Check the Server Container URL in your GA4 Config tag. Confirm DNS shows as verified in your Servero dashboard. Confirm no trailing slash in the URL.
CAPI tag fires but Event Match Quality is stuck below 5 → Customer data (email, phone) isn't making it through. Check that Shopify's checkout data layer is pushing customer fields to your GA4 event parameters. This is a data layer configuration issue, not a server container issue.
Setup worked in preview but not in production → You published the web container but forgot the server container. Go to the server container workspace → Submit → Publish.
Conversions are being double-counted in Meta → The event_id isn't matching between Pixel and CAPI. Confirm you added the {{Event ID}} variable to both the Meta Pixel tag AND the GA4 purchase event tag in the web container — Step 6.
What You've Built
Your Shopify store now has:
A server-side GTM container running on your own subdomain, hosted automatically
All GA4 events route through your server first - you control the data pipeline
Meta CAPI sends purchase events server-to-server, bypassing browsers, ad blockers, and iOS restrictions
Deduplication working - Meta counts each conversion once, correctly
A foundation ready to add TikTok Events API, Google Ads Enhanced Conversions, and first-party cookie extension in 15 minutes each
The attribution gap between your Shopify dashboard and Meta Events Manager will narrow significantly over the next 48–72 hours as server events flow through and the algorithm recalibrates.
Check back in one week and look at your Event Match Quality trend. It should be climbing as real customer data accumulates. If it's flat, revisit whether the customer email and phone are populating correctly in the Shopify checkout data layer.
Your server-side container is waiting. [Start free on Servero — no GCP account, no credit card needed →]